Tuesday, November 29, 2011
Well, I made it through Thanksgiving. I gained a few pounds, but who has not. I guess working in my craft room isn't counted as exercise.
Todays card is the second most demanded type of card that my better half asks me for, "Thinking of You". Here is the most recent one I made;
Friday,November 25, 2011
I hope everyone had a great Thanksgiving. I always look forward to the holidays, because one of my favorite activities is eating. I can realy chow down. Yesterday was no exception.
So in honor of this theme, here is a simple 5"X5" card that I made;

Friday, November 11, 2011
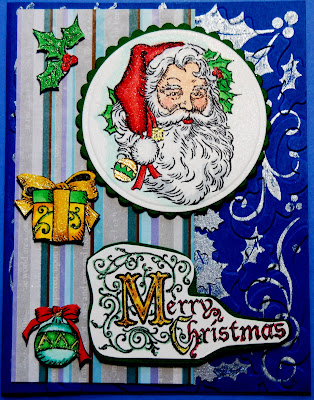
I have been trying to get motivated to finish up my Christmas cards. So today I sat down and worked on one with an image from "Close to My Heart" called "St. Nick"# B1356. In fact I used all of the stamps in the set on the this card.


The images were colored using Copic markers on "Cryogen Iradescent Paper'.That is the sparkle that you see in the image. It is right in the paper and shows through the Copic markers. The colors that I used were;
Hat; R22,R24,R27,R29
Face; E000,E01,R20
Holly; YG05;YG09
Beard; C1
I used Spellbinder dies to cut out the image and the mat. Both dies were from the Petite Circle series. The patterned paper is from a set from "Close to My Heart" called "Wonderland" # X7146B.
The background on the main card was accomplished using one of the new "Hero Arts" stamp and embossing set called "Holly".
To cut out the smaller images, I used my "Glass Mat" and a new xacto knife.
I think it's a very cute card which does not take much time to assemble.
If you have a question about the card or products used, please let me know.
All of your comments are as always appreciated.
Have a GREAT DAY!!!
Bob L.
Sunday, November 6, 2011 The card it's self is self explanatory. Although the glitter does not show well in the picture, believe me it really glitters when you see it first hand.But, the stamping of the image of the flower is the technique called "Burnished Velvet". To stamp the image I used a "Glue Essentials" Glue pad. The pad looks like a standard ink pad, but with one difference. The glue pad need to have glue applied everytime you use it. It does not require a lot of glue, but needs to be applied each time you use it. After you apply the glue to the pad, you are ready to stamp you image. Stamp the image on the paper. This is very important wait 15 minutes for the next step. After the 15 minutes is up, we are going to do the "Burnished Velvet" technique. The product I used here is "Jewel Glitter Ritz" it is a Micro Fine Glitter. The glitter is different in that it has very little excess powder in it. You might as well say it's pure glitter, and it goes a long way. Once the 15 minute is done, the glitter can be applied. Take a very small amount of glitter and apply it to the image in several places. With your finger and very light pressure rub the glitter into the image. Once the image is completely cover, tap the rest of the glitter off. Using a large makeup brush the rest of the glitter off the image. The glitter comes in 60 different colors. So, you should be able to find a color to go with your project. This glitter and technique works on both ligh and dark color cardstock. Give this technique a try, you'll love the effect. If you have a question, please don't hesitate to ask. Have a GREAT DAY!!! Bob L.
"Happy Birthday"
Monday, November 1, 2011
Todays card is called a "Criss Cross Card".Very simple card to make once you do the cutting. I saw the idea on the "Split Coast Stampers" site. Here is where you can get the instructions.
The image is from "Close to My Heart" and the stamp set is called"Enjoy Every Moment" #C1395. The set is from the Spring/Summer 2011 catalog. As you will notice the image is mounted upside down, but that's how the grow on the fence in my yard. And, here is the card;
 The card was colored with with Copic Markers using the following makers;
Flowers; B00,B01, B04
Leaves; G02, G05
The mats were cut with a Spellbinder die set called "Labels Four". I did sham stiching on the body of the patterned paper with a blue multiliner pen. Some glass half pearls were added to the front of the card.
Very simple card, but I think it turned out alright.
What do you think?
Have a GREAT DAY!!!
Bob L.


