"Christmas Cardinal"

Wednesday, September 25, 2012

I have become intrigued with a new maker that I have seen advertised in some of the magazines. The markers are called "Spectrum Noir".  They are alcohol based markers that can be blended, and refilled.

These markers are comparatible to the now famos "Copic" markers.

I bought a couple of sets at my local "Joann's" for $14.99 a set of six. With a 50% off coupon that came to about $1.25 for each marker. Not a bad price!!!

I am quit impressed with the results that I was able to obtain with the markers, but I'll let you judge for your self.


"Christmas Cardinal"


The stamp set is from "Close to My Heart". The background paper is from "Joann's". And, the light green leaves where cut on my Cricut.

All in all I think that the Spectrum Noir markers are well worth the money especialy when using acoupon at Joann's. It gives you a good alternative to the pricey "Copic" markers.

If anyone else has had experience with these markers, let me hear from you.

Have a GREAT DAY!!!

Bob L.

"Wonder and Joy"

Saturday, July 14, 2012

It has been a busy week, but I did get to finish up a couple of projects. Mostly at the Thursday card get together.
The card that I am posting today is called "Wonder and Joy". It reminds me of when I was a child and I was always doing something that my mother, who was city raised, thought was icky. But, I thought it was great fun.

So here is the card, and you will see what I was into;

"Wonder and Joy"


The stamp set is a set from the now defunct "The Angel Company". I sold for them for about 12 years until they closed shop. A company called "RedRubberDesigns" bought up most of thier designs.

You will notice that I used another "EK Success 2 in 1" punches for the trim along the bottom of the card. There are I think 5 different punches to be had, at Joann's.

The image was stamped with Memento ink and colored with my Copic markers on "Cryogen Cardstock". The background of the card was stamped using the remainder of the stamps in the set using Versa-Mark ink to stamps the watermarks. A little Stickles was applied to give the card some bling.

Very simple card, but the wife liked it.

Have a GREAT DAY!!!!

Bob L.

"Happy Birthday Card and Product Review"

Wednesday, July 4, 20012

I hope everyone is enjoying thier 4th of July. I surpose to be in the high 90's today, so I believe most of our activities will be inside. Not that I'm against doing a little BarBQ ing.

Todays card is one that we made at our monthly club meeting.

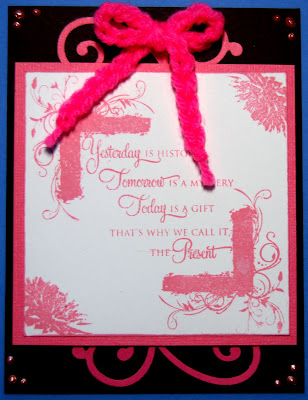
I made a birthday card because everyone needs Birthday cards.Seeing that I'm always late sending out cards, I thought this sentiment was appropriate. And here is your look at the card.

"Happy Birthday"


The stamp set used is from "Close to My Heart" called "Card Chatter-Birthday" # D1475 and the cost is $17.95. The mats wghere cut out using the Spellbinder die set "Label Eight". The front of the card was embossed with a Cuddlebug Embossing frolder called "Birthday". The decoritive strip was cut with an EK Success punch. More about the punch below.

"Product Review of The EK Success 2 in 1 Punch"


The punch is fairly new and  I got this one at Jo-Anns. The cost of the punch is $25.95, but with a 40% off coupon it is very reasonable at $15.57. Here is how the punch looks;

"EK Success 2 in 1 Punch"

The pink lever on the left front on the body of the punch is how you select the type of punch out that you want to do.The lever is currently set to #2 which is the edge punch, and #1 is for the complete cutout to give the strips that I used on the top and bottom of the card.

One note on the use of these punches. The need to be pressed very firmly, in other word they punch hard. In the #2 setting, the punch lever only goes half way down. Thats because it only cuts half the pattern. In the #1 setting the punch must be pressed down hard to get the effect.

"Punch Outs"

The top example is lever setting #1, and the bottom example is using lever setting #2.

The punches come in five(5) different patterns that I have seen so far, but there may be more. You can also cut the #1 pattern in a contasting color and overlay it over the bottom pattern. This gives a great look. Try one you will like them and find many uses for them. They are not only cost effective, but they save space.

That's all for today.

Have a GREAT DAY!!!
Bob L.

"Plant a Seed"

Friday, June 15, 2012

I Know, I Know. I have been away along time. I just went into a funk and my creativity went away. Probably to many other interests. But, I;m finally getting my mojo back.

The first card I'm posting is from a stamp set from "Close to my Heart" called "Friendship Bouquet" # S1205. It was a STOM for the month of May 2012.

Without further delay here is the card for today;

"Plant a Seed"


I used several Spellbinder dies on this one. The mat for the flower and the saying was the "Heart Circle S4-316" and the stamping mat, I use the "Standard Circles". 

The flower was stamped and colored with Copic Marker, then I used the overhang method to cut out with the die.

The top half of the main mat was cit on a diagonal and embossed with a Cuddlebug embossing folder. On the bottom half of the front I used an old dot stamp to give it some dimension.

Well, that's all for today. If you have a question or a comment please contact me. You comments are always welcome.

Have a GREAT DAY!!!
Bob

"Something Different"

Tuesday, February 7, 2012

Todays card is something different for me. All of my regular cards are usually colored images, but todays card is made using my Cricut Imagine. Yes that's right my Cricut Imagine.


I will call the card a "Thank You Tree"


"Thank You Tree"


This is the first time that I have made an entire card with nothing but my Cricut Imagine. One advantage for using the Imagine is that you can use the RGB codes from any paper and duplicate it on the Imagine. Plus, you can match the cardstock colors for most companies such as "Stamp'nUp" or "Close to My Heart". That's a big advantage in card making.


I used one cartridge to make this card called "Ultimate Creative Sampler". This cartridge comes with six different overlay mats. That's alot of images.


The card body was embossed using a Sizzix Embossing Folder then sanded lightly.


Hope you enjoy todays card and will leave a comment.


Have a GREAT DAY!!!


Bob L.

"The Present"

Monday, January 30, 2012

I spent the weekend helping a friend build a new pole barn for all of the equipment he has. Tractors, boats and associated pieces. I love doing this type of work and look forward to it. But, because of my bad knee, I don't do as much of it as I would like.


The card that I am posting today is a card that I made Friday. For this card I used a stamp set from "Close to My Heart" and it is called "The Present" # D1436 and sells for $17.95. Very cute set and I use it quite often. Here is the card;


"The Present"


The image on the card uses three images from the set and the images are stamped using the "Blush" ink pad from "Close to My Heart". This ink give a very pale, but pretty color.

I used a Quik-Kutz die to cut out the swirls on the top and bottom of the card on a matching pink card stock. I then added the "Liquid Pearl" dots to the corners of the card.


My wife made the crocheted bow for the top of the card. She is very handy at doing these kind of handcraft items.


Hope you enjoy my efforts and will leave a comment.


Have a GREAT DAY!!!

Bob L.

"Six-Fold Card"

Monday, January 23, 2012


Well it has been a long two months. I can't realy say why I have been so busy, or should I say distracted. But, I have been.

The card and instructions that I have posted today I saw originally on SplitCoast Stampers that was presented by Monique Trappeniers. It took me awhile to get the card right, but I finaly accomplished. So, thanks SplitCoast Stamper and Monique Trappeniers for the inspiration.

The card is appropriately calle a "Six-Fold Card", and you card see why from the pictures.


"Six-Fold Card"


I used this on in a card class that we had last week. Here is what the card looks like when it is opended. Count the folds to see where it gets it's name


"Six-Fold Card Un-Folded"


The card is simply to make once you get the folding and cutting down. The main body of the card is an 8"X12" piece of card stock. The piece of cardstock is scored at 4" and 8" along the 12" side.


Then score the 6" side at 2" and 6".The remaining step is to cut the card out using the score lines. I have inserted a diagram of the cutting sequence below.


Keep your piece of cardstock in the same orientation as the picture above and you should not have any trouble getting it right.


Once you are done cutting and folding the card, the fun is in the decoration of the card it's self.


Give this card a try, you will love the results.


Have a GREAT DAY!!!
Bob L.